Saturday, December 28, 2013

Helianthus annuus L. redux


This time in wondrous color...


Let It Shine

Hasselblad, 80mm CB, and an extension tube. Kodak Portra 400 film.

Sunday, December 15, 2013

Helianthus annuus L.


Ascendant Sunlight

Tabletop image - the Hasselblad, Arista EDU film, an extension tube, and a patient sunflower.


Saturday, November 2, 2013

35mm Film Canister Image


One more from the little 35mm film canister... a postage-stamp sized piece of Ilford photographic paper was used. Probably a five-second exposure. Distortion from curvature of the paper.


Space Warp

This is the courtyard of the 4th Presbyterian Church along Michigan Avenue in Chicago.

Wednesday, October 23, 2013

One-shot Wonder - Polaroid J66 meets Traditional Film


About a decade ago, a Polaroid J66 camera found a way into my collection of dusty, obsolete cameras. Manufactured from 1961 - 1963, the film vanished decades ago. Since I like to try exposures from old cameras, I was looking at ways to stuff 35mm or medium format film into it to see what delights might arise. I stumbled across a post that described a near-perfect fit for a single sheet of 4x5 film.

Since the original film was quite fast compared to the 400ASA sheet film I was using, I had to think of a way to slow down the shutter speed. The camera used a pneumatic shutter system controlled by a photocell on the front of the camera. I taped a piece of neutral density stock over the photocell to fool the system into the slowest available speed. With the manually controlled aperture set wide open, the exposure values would work with the HP400 sheet film in a bright, sunny 16 scene.

One the walk to work on a wintry day in Chicago about a decade ago, I stopped to make the exposure at the Gehry Bandshell in Millennium Park. At the time, I processed my own black and white film. I was surprised at the result.


Gehry Bandshell
Click for larger view

The one-shot wonder worked well. This is the only image that I have made with the camera.

Sunday, October 20, 2013

Theme Park in Fort Dodge, Iowa...


Sadly, this enticing attraction has been dismantled.


The Wheel

Click for larger view.

Kodak TMax 400. Hasselblad, 80mm.

Saturday, September 7, 2013

New use for old cut film holders...


I have a few old wooden Fidelity cut-film holders. No longer useful for exposing film, I decided to use them to frame prints. Each side will hold a print.


The print is trimmed...
Note the barrel distortion of the lens from this little digital camera. I'm not impressed.
Click on images for larger view.


...and into the holder.


The fish are intrigued.


The slide invites exploration.

Saturday, August 24, 2013

Darkness cannot drive out darkness... Dr. M.L. King


Daley Plaza, Chicago... rally from a decade back. Black and white film, this was scanned from one of the few prints that I had made at A&I in Los Angeles.


Darkness cannot drive out darkness...


From the same rally... scan from the 35mm negative.


Wednesday, August 7, 2013

Serene


South of Stanhope, Iowa. Large format film.
Click for larger view.


Tuesday, July 30, 2013

Sunrise

I had to buy a few of these unusual sunflowers. Joyful.
Kodak Ektar film, a Hasselblad, and an extension tube.
Click for a larger view.


Fractional


 Expressive


Sunrise

Friday, July 19, 2013

Sprocket Project, Part II

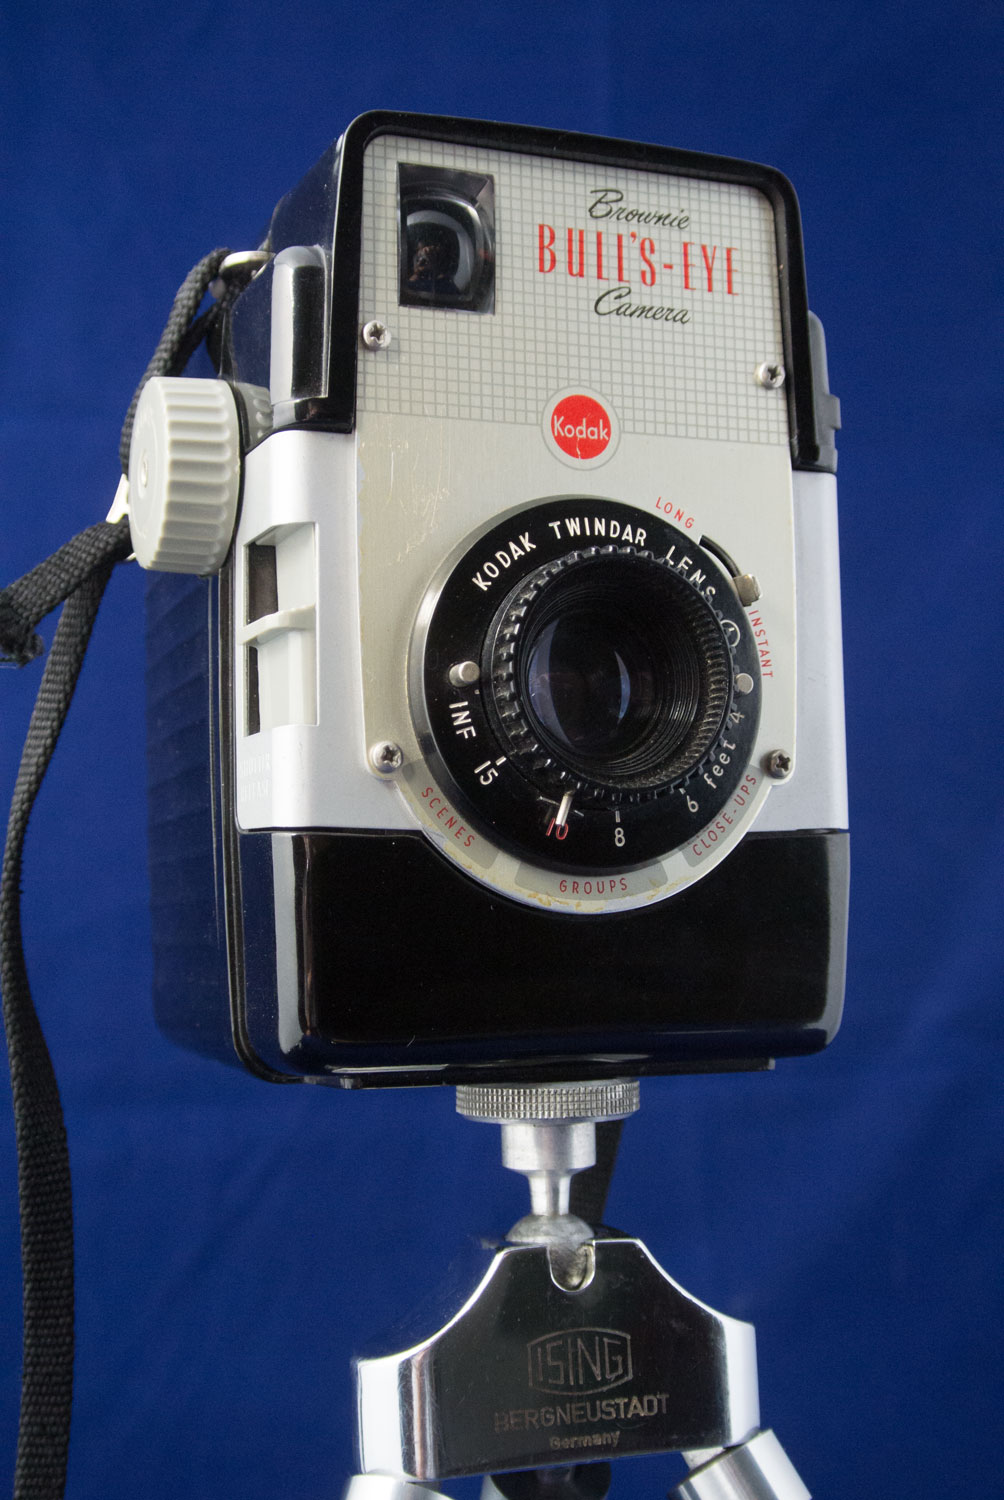
There are several factors to consider when using old cameras that use an obsolete film format. The Kodak Bulls-Eye has a fixed aperture and shutter speed. The only adjustment is a crude focal scale on the lens. The fixed shutter/aperture combination impacts film choices in terms of the ASA rating. I will skip the lengthy technical explanation and focus (so to speak) on the simplest application for this camera.

The trickiest part of the project is dealing with the mechanical realities - ignoring the "Use 620 film only" proclamation. The following imagery will demonstrate the film loading process.


First, we need to figure out how to advance the film. The 620 format film for this camera had a paper backing with printed  numbers. As the Wind knob is turned, the numbers magically appeared in a small red window. Without that reference, exposures would overlap, or film would be wasted. Since the 35mm film we will use does not have a paper backing, we need to figure out how far to turn the mysterious wind knob.


Cut a 12 inch strip of paper, perhaps an inch in width - and thread the end into the take-up spool.


Mark the limits of the exposure area.


Note the position of the WIND knob, and turn it one revolution. Note that the film has moved approximately one-third of the distance across the exposure area.


Two turns, a little more...


Three turns... almost there. Film is thicker than paper, so this is not an exact art. Film tension and thickness will cause the take-up diameter to vary as film is wound onto the spool. I will use 3-1/2 turns with this camera. This leaves sufficient space between exposures. Typically, I get seven exposures, on 36 exposure 35mm rolls, from various cameras.

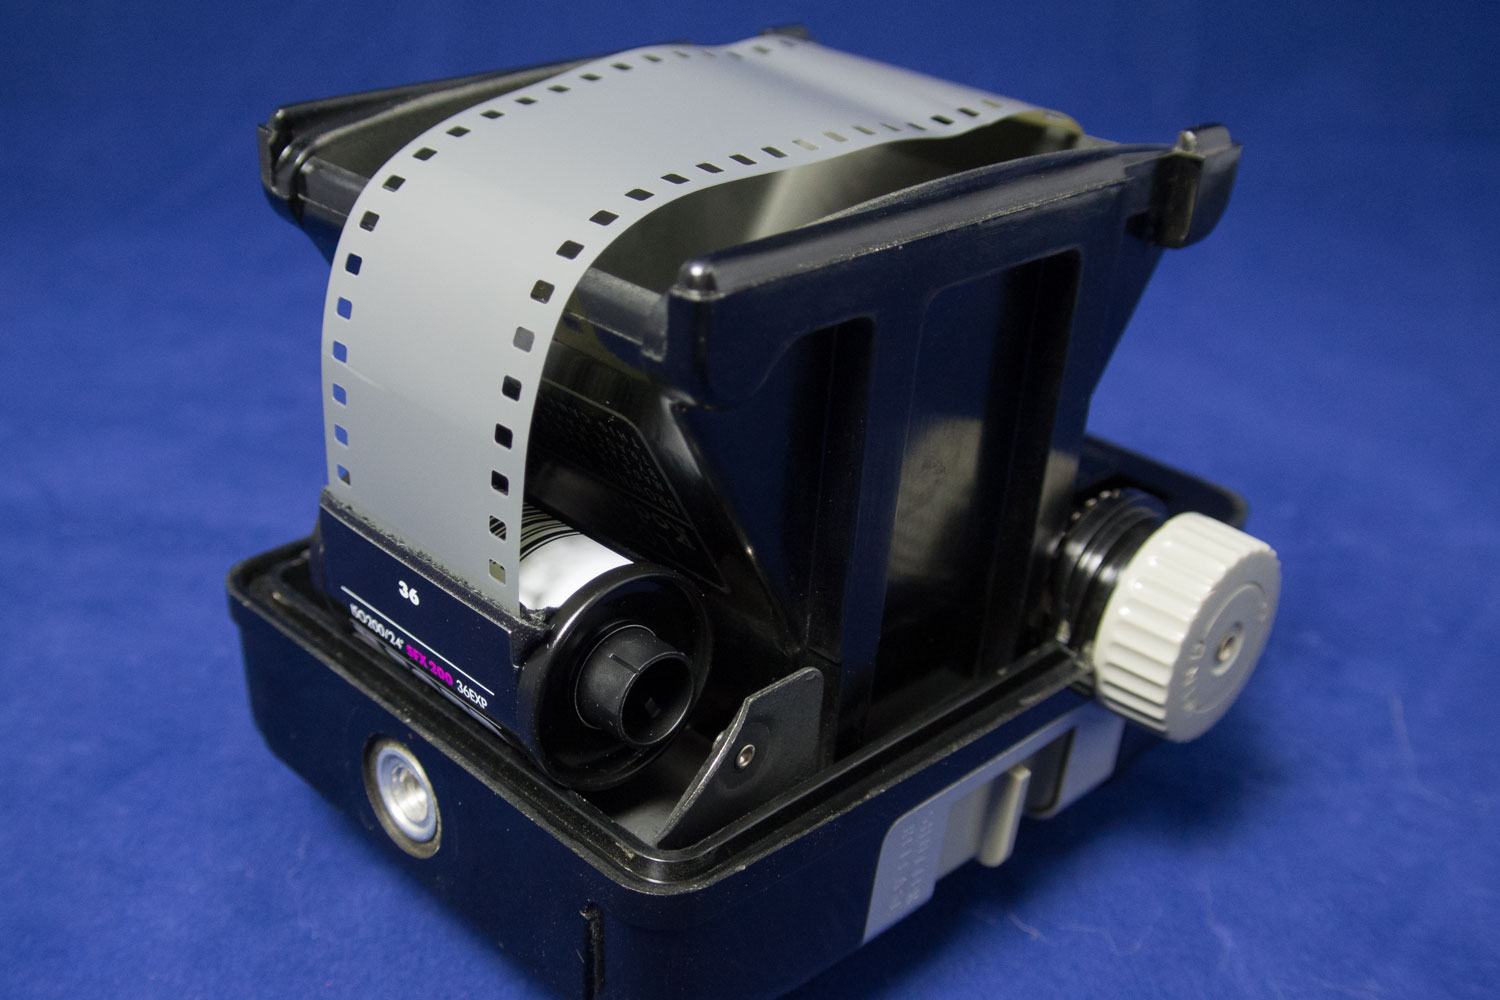
Next, load the film. Usually, I use Kodak TMax 100. The film illustrated here is some Ilford SFX 200. This camera does not have an aperture adjustment. The fixed shutter and aperture were designed for slower film of the past, so this faster film is better suited for images in shaded areas. There is some exposure latitude, so I will try exposures under different lighting conditions.


Note how the 35mm canister fits neatly within the supply-side film area. Drag the end of the film over the edge...


...and onto the take-up spool. I centered the film. Note that the film may wander to one side or the other during use. That might serve as a value-added artistic feature...


Another view of the loaded film.


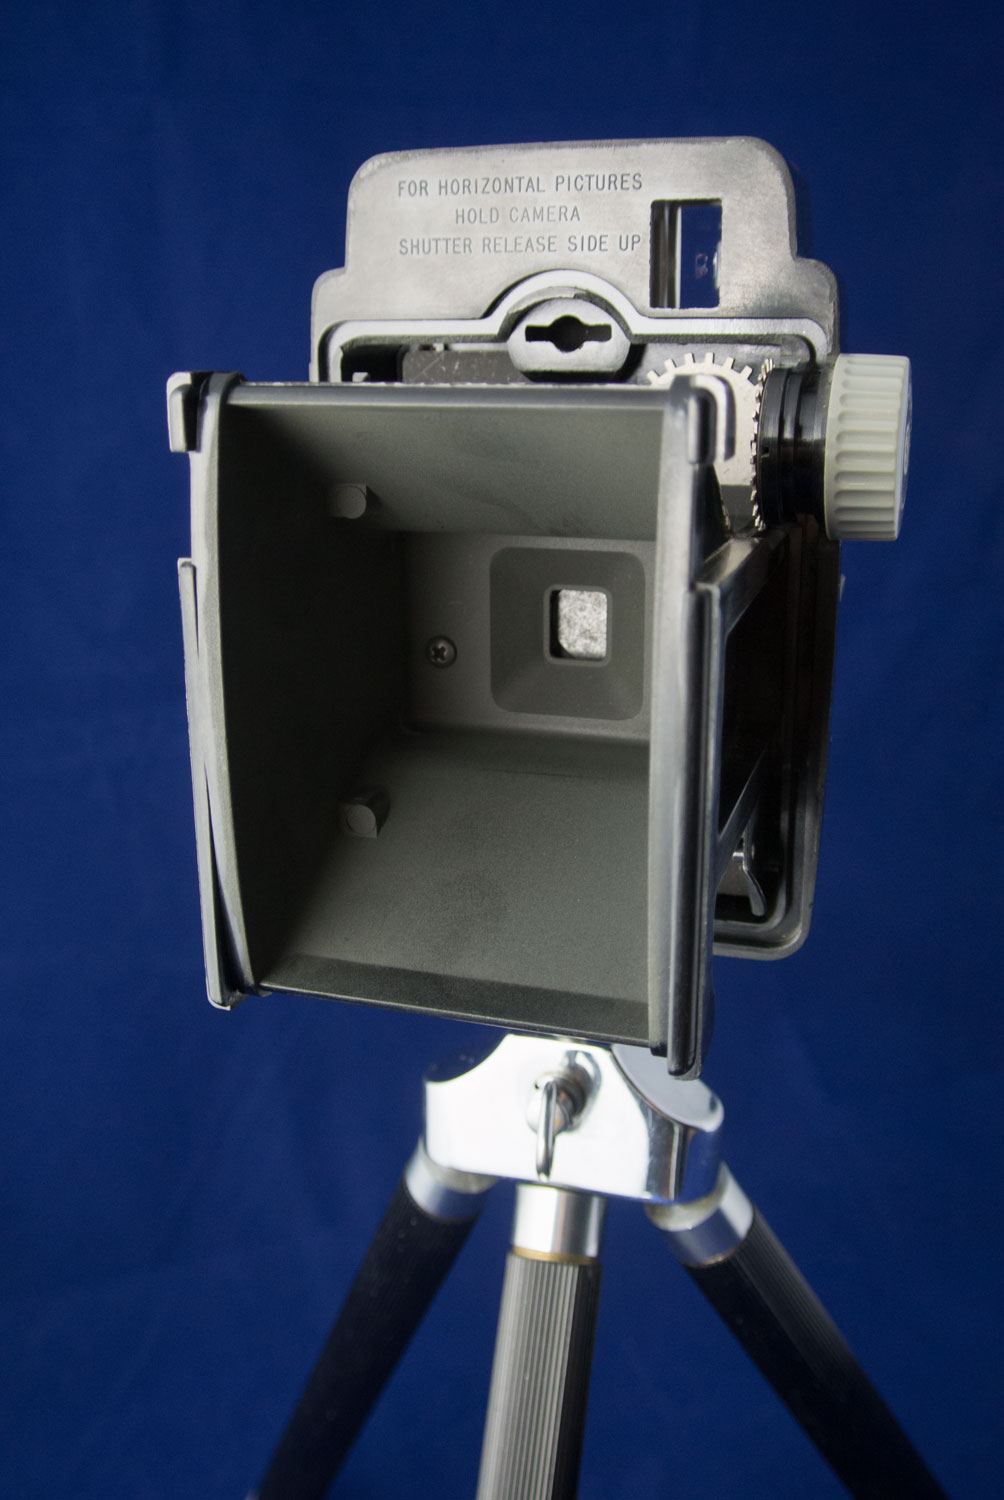
Remember the secret red window? We need to cover this up before closing the camera for use.


I placed some paper over the plastic window. They are fragile. If preserving the camera is not important, don't worry about it.


Final assembly.


Almost ready to go!


Once the cover is in place, remember to advance the film prior to the first exposure. A lot of film was exposed to the light, since we had to pull out a lot of it for loading. To account for that total length, I turned the wind knob five revolutions.

I positioned the film through the center of the exposure area. Remember to compose you image for this narrower film.


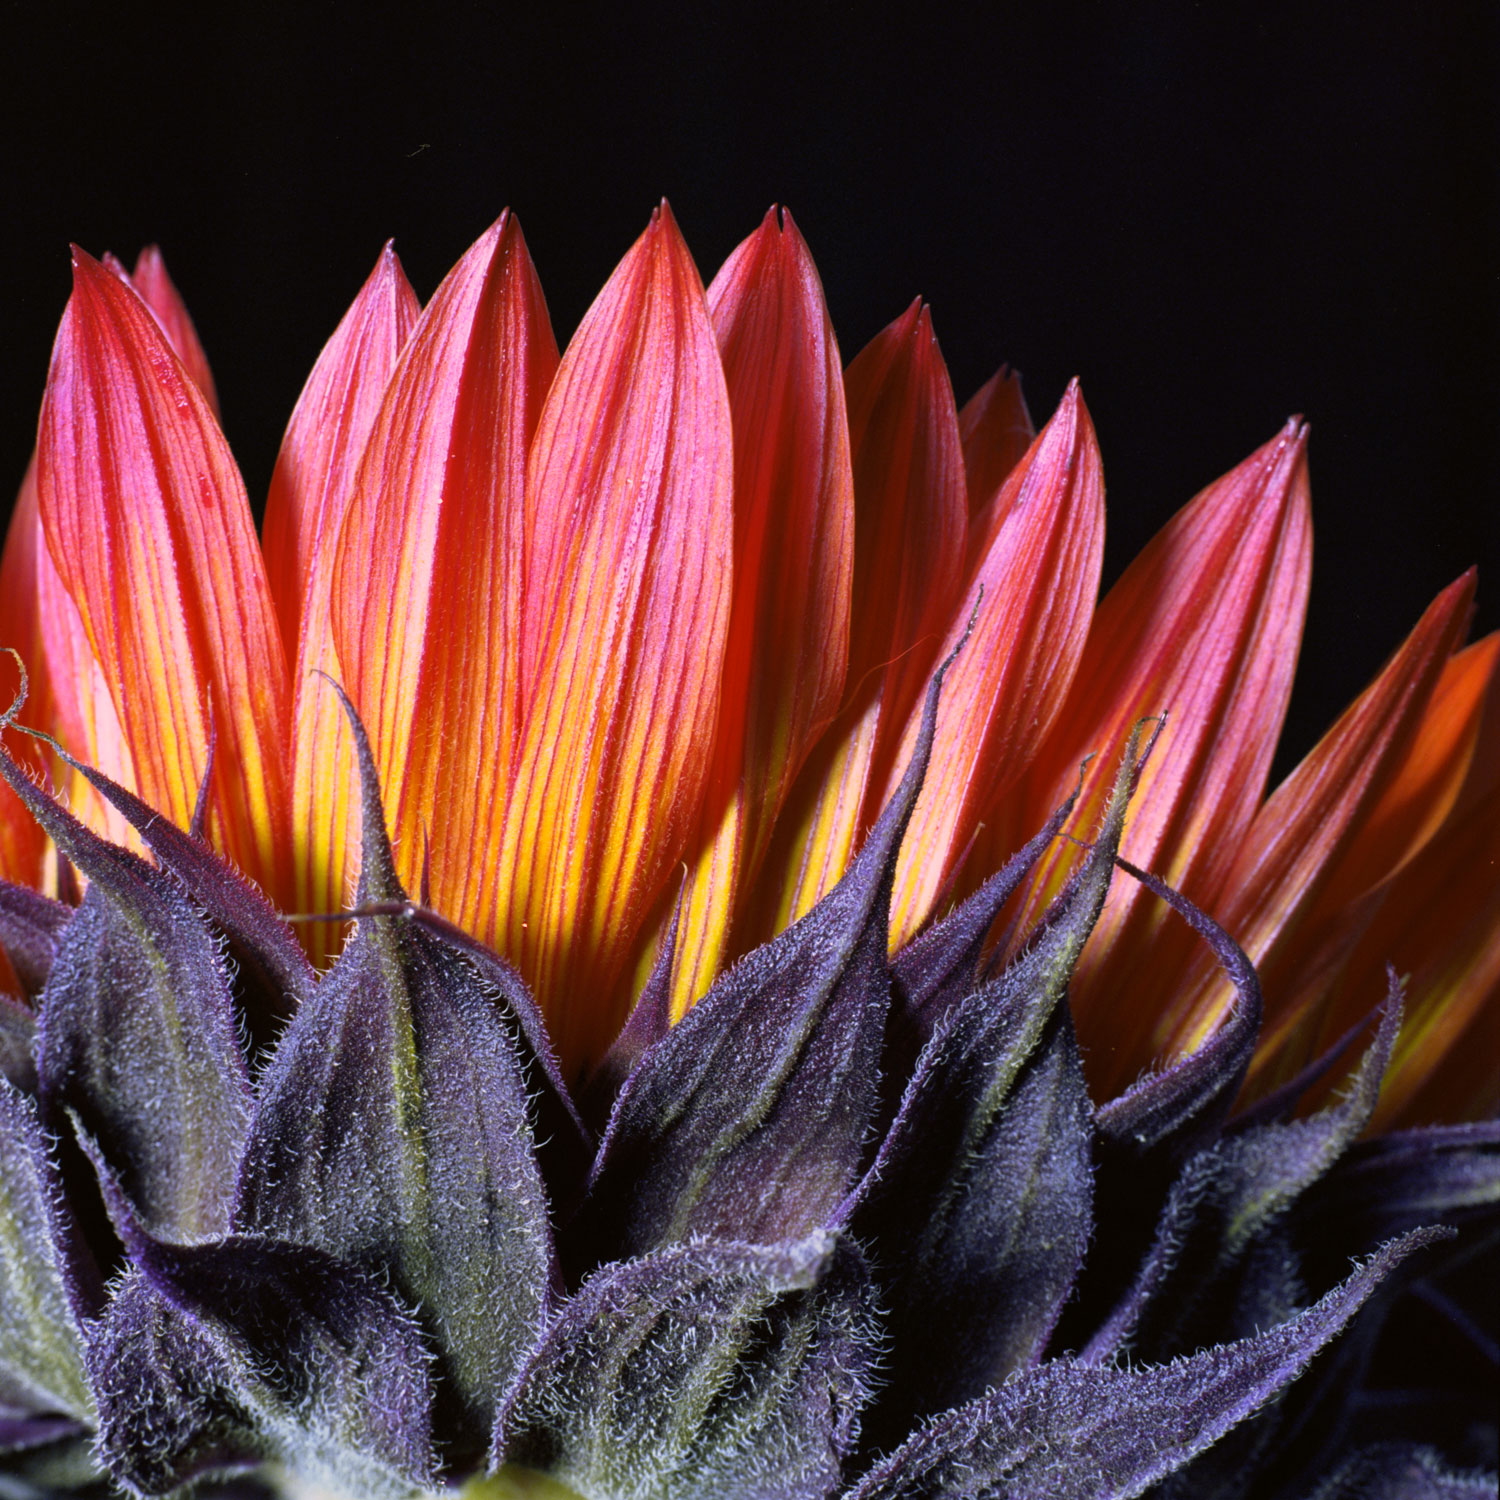
A sample from an old Kodak box camera. Click for a larger view.

The last tricky bit... unloading the film. The old paper-backed film formats were simply wound off of the supply spool. Since we are using 35mm film, it is not possible to simply wind it back into the film canister. Rats! As you make exposures, wind the film slowly until you feel the film stop. You will have to create some sort of home darkroom. In complete darkness - not a hint of light - you will have to open the camera and remove the film canister and take-up spool. Then, you can manually turn the 35mm spool to rewind the film into the canister. Send the film off to the lab - and wait. 

In a future post, I will display images from this camera.


Monday, July 15, 2013

Magic from a Simple Camera, Redux

Ilford photographic paper, about the size of a commemorative postage stamp, was curled inside of a plastic 35mm film container. The curvature of the paper distorts the view. Note the characteristics of the distortion - the central horizontal zone is nearly linear. This also demonstrates the extreme apparent depth of field of tiny apertures.

Merchandise Mart
Click for larger view

Thursday, July 11, 2013

Sprocket Project Part I

The next several posts will detail a method to use available film in almost any old camera. This is an initial look at a candidate.


The Secret Project Camera
Click for larger view


We don't need the flash bits...
Click for larger view

These were made in the late 1950s, and used the popular 620 medium format film.


Really? It is possible to wind currently available 120 film onto the smaller diameter 620 spindle. I've done it... using an alternative format is more entertaining.
Click for larger view


Sneaking up from behind... Note the red window in the lower left. We'll need to cover it later.
Click for larger view


Back Case Removed
Click for larger view


Exposure area...
Click for larger view

Future Post: Part II, Choosing film, loading options, and operation.


Wednesday, July 10, 2013

Old Cameras and Sprockets...

When a film format is discontinued, the cameras are usually relegated to attics, shelves, basements, or the trash. I have acquired numerous old cameras, and enjoy exploring the technology and image quality. There are some spectacular artistic possibilities, due to characteristics of the old lenses. Imperfections become opportunities for striking portraits or landscapes, through vignetting, soft focus, or an ethereal glow in the highlights of a lens with a worn coating.

This image was simply a proof of concept experiment. I noticed that a 35mm cannister fit easily inside a Kodak box camera, which normally used some obsolete variation of medium format film. Since the 35mm film is much narrower, the film is exposed to the edges, past the sprocket holes. For amusement, I made several exposures of the Wrigley Building in Chicago, combining parts of two exposures.


Kodak Box Camera

I'll go into more detail about this process in a future post.

Tuesday, July 9, 2013

Stereoview - 3D Illusion

I wanted to try creating a stereoscopic image pair with the Omniscope camera. This is nothing new - check out these images of the Smithsonian Institution, from 1858. Enlarge the images on your monitor. Look at the center of the image pair, and slowly cross your eyes. A stereoscopic image will appear.

For this experiment, I made four images of the Agora sculptural installation. The camera was moved a few inches for each exposure. Once the film was processed and scanned, I printed two images that are approximately 38 inches wide. At the 2008 Around the Coyote Fall Arts Festival, I mounted the images side by side to demonstrate the effect. It is difficult to achieve for some people, as the images are low in contrast.

Enlarge the image on your monitor. Look at the center of the image. Slowly cross your eyes until the images merge. 


The effect is subtle, yet I was amused with the possibilities. Another pair exists that is easier to view, and there are some ideas that I will explore that will create a stronger illusion.


Saturday, July 6, 2013

Fortuna's Wheel

This image was taken along north Michigan Avenue, probably in 2003. There was little time to adjust focus, I had only a few seconds to react to this stark contrast in fortune. A famous toy store was nearby,  note the girl with the new doll. This homeless person had been in the area for years.


Fortuna's Wheel
Click for larger view

Leica IIIf, Summarit 50mm f/1.5.

Surrealism and the Fan

This animation is from four images of an antique fan. For each image, the fan was unrolled with the Omniscope camera. They are not computerized effects. For each exposure, I rotated the blades a little. After each image was scanned, a little GIF animator was used to create the motion.


An Unusual Sort of Fan...

In Rural Iowa...

Traveling through rural Iowa, I made a brief detour into the center of a little town. I was intrigued by these little painted faces, below the window of a storefront. In collage form, the band...


The Band
Click for larger view

Friday, July 5, 2013

Magic From a Simple Camera

The simplest cameras  that I have made are composed of just a few parts. A tiny box with a lid, such as an Altoids tin, the pinhole, and a shutter. For this image, I used a precision-drilled pinhole, available from Pinhole Resource, in an Altoids tin. Optimal sharpness of an image requires a specific pinhole size relative to the distance to the film, paper, or digital sensor. I've used these in cameras that range in size from a 35mm film canister, to a steel shoe-box sized camera that used 5 by 7 inch photographic paper. The pinhole set is available here: Pinhole Sets, Zone Plates, and Turrets.

I used a hole-punch tool to make a 1/4 inch diameter hole in the lid of the tin. I then used fine sandpaper inside the box, so that flat-black spray paint would adhere to the surfaces. This reduces unwanted reflections. The pinhole was then centered in the 1/4 inch hole, and secured with tape.

The light through a pinhole will create a cone of approximately 120ยบ. For the Altoids tin, this results in an image circle that is similar to an old silver dollar. Upon exposure, the image will have a spectacular vignette. This is exactly the way the image appears on the photographic paper, in negative. For a shutter, I used a flat magnetic business card.

One challenge with homemade cameras is the lack of a viewfinder. A little imagination, and the ability to visually ray-trace the desired scene will get you close to the desired composition. And a little luck... You will also have to guess exposures. There are many calculators available on the web. From the Ilford photo site, check out this exposure calculator. This exceptional site, by David Balihar, has excellent information about pinhole camera photography.


Pintoid Camera


With my tiny camera loaded with Ilford photographic paper, I set off to work. For about a decade, I walked from Union Station to various workplaces along Michigan Avenue. Since I use pinhole cameras frequently, I am usually able to guess exposures. The actual exposure times are not extremely critical, as film and paper usually have sufficient exposure latitude for small, or even moderate errors. Poor results can often be salvaged with the excellent scanners and software available.

This is the Merchandise Mart. I set the little Altoids camera on the wall along Wacker Drive, and simply lined up the face of the box with the building. I guessed an exposure of five seconds. Once I got home, I processed the little paper negative.


Merchandise Mart
Click for larger view

This has long been a favorite image.